As an Amazon associate, I earn from qualifying purchases.
A treadmill motor control board is a crucial component of your exercise equipment, responsible for regulating the speed and power of the treadmill belt. If you are experiencing issues with your treadmill, such as erratic speeds, sudden stops, or no response, it may be due to a faulty motor control board.
Testing a treadmill motor control board is crucial in diagnosing and fixing any issues with your treadmill. To properly try the motor control board, having the right tools and knowledge is essential for effectively testing and troubleshooting the motor control board of a treadmill to ensure accurate results.
Luckily, there are steps you can take to troubleshoot and fix the problem without having to replace the entire board. This article will provide comprehensive guidelines on how to test a treadmill motor control board.
What is the Treadmill Motor Control Board:
A motor control board, also known as a motor controller, is a circuit board that controls the speed and incline of the treadmill’s motor. It receives input from the user through the console and adjusts the speed and pitch accordingly.
The treadmill motor control board is vital to the machine’s performance. It acts as the brain, controlling and coordinating various functions to ensure a smooth and efficient workout experience. This compact electronic circuit board receives signals from the user interface, such as speed and inclines adjustments, and translates them into commands for the motor.
Overview of the Components and Functions of a Treadmill Motor Control Board:
Understanding the components of a treadmill motor control board is essential for troubleshooting any issues that may arise during use and for those interested in DIY repairs or modifications.
Key components found on a typical treadmill motor control board:
-
Microcontroller:
This is the motor control board’s central processing unit (CPU).
Purpose:
It is responsible for executing instructions and controlling the overall operation of the board.
-
Power supply:
The power supply provides the voltage and current to operate the motor control board and other components.
Purpose:
It converts the incoming AC power from the wall outlet into DC power suitable for the board’s operation.
-
Motor driver:
The motor driver is a circuit that controls the speed and direction of the treadmill motor.
Purpose:
It receives commands from the microcontroller and delivers the appropriate power to the motor based on those commands.
-
Speed sensor:
The speed sensor measures the speed at which the treadmill belt is moving.
Purpose:
It provides feedback to the microcontroller, allowing it to adjust the motor’s speed accordingly.
-
Incline sensor:
The incline sensor detects the treadmill deck’s angle of incline or decline.
Purpose:
It sends this information to the microcontroller, which adjusts the motor’s power output to match the desired incline level.
-
Console interface:
The console interface allows communication between the motor control board and the treadmill’s console.
Purpose:
It receives user input from the console, such as speed and incline adjustments, and sends corresponding signals to the microcontroller to initiate the necessary changes.
-
Safety features:
Treadmill motor control boards often include safety features such as an emergency stop button or a safety key.
Purpose:
These features are designed to stop the treadmill immediately in an emergency or when the safety key is removed.
-
Capacitors:
Capacitors store electrical energy and help regulate the voltage on the motor control board.
Purpose:
They can provide a burst of power when needed and help stabilize the voltage during operation.
-
Resistors:
Resistors are used to limit the flow of electrical current in specific circuits.
Purpose:
They can help control the motor’s speed or power output by adjusting the circuit’s resistance.
-
Diodes:
Diodes are electronic components that allow current to flow in only one direction.
Purpose:
They can protect sensitive components in the motor control board from reverse voltage or rectify AC power into DC power for the board’s operation.
Functions of A Treadmill Motor Control Board:
-
Regulate the speed:
One of the main functions of a treadmill motor control board is to regulate the treadmill’s speed. It receives signals from the user interface, such as pressing buttons or adjusting settings on a touchscreen, and changes the motor speed accordingly. This allows users to increase or decrease their pace during a workout quickly.
-
Control the incline levels of the treadmill:
Another essential function of the motor control board is to control the incline levels of the treadmill. By receiving signals from the user interface, it can adjust the angle of the treadmill deck to simulate different types of terrain or increase the intensity of a workout. This feature allows users to customize their training and target other muscle groups.
-
Monitors and regulates the power supply:
Additionally, the motor control board monitors and regulates the power supply to the treadmill motor. It ensures that the engine receives a consistent and appropriate amount of power to operate efficiently and prevents it from overheating or burning out. This function helps prolong the lifespan of the treadmill motor and ensures its reliable performance.
-
Monitoring and controlling various safety features of the treadmill:
The motor control board also plays a crucial role in monitoring and controlling various safety features of the treadmill. It receives signals from sensors on the treadmill, such as those that detect belt speed or emergency stop buttons, and quickly responds to ensure user safety. For example, if a user falls or trips on the treadmill, the motor control board can immediately stop the belt to prevent injuries.
-
Responsible for monitoring heart rate functions:
Furthermore, the motor control board monitors heart rate functions on some treadmills. By receiving signals from heart rate sensors built into the handlebars or through wireless connections with chest straps, it can display and adjust workout intensity based on the user’s heart rate. This helps users maintain their target heart rate zone and optimize their cardiovascular workout.
Treadmill Control Board Circuit Diagram:
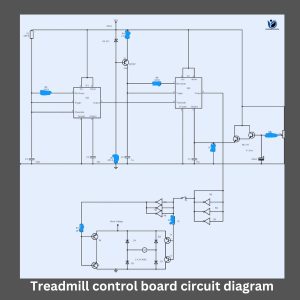
How does the treadmill motor control board interact with other parts of the treadmill?
The motor control board is responsible for controlling the speed and incline of the treadmill. It receives signals from the console, which allows users to adjust these settings according to their preferences.
-
Interactions with the motor:
- When a user increases or decreases the speed or incline, the console sends a signal to the motor control board, instructing it to make the necessary adjustments.
- In addition to receiving signals from the console, the motor control board communicates with other parts of the treadmill to ensure coordinated operation. One of the main components it interacts with is the motor itself.
- The motor control board receives feedback from sensors within the motor, such as speed and torque sensors, allowing it to monitor and regulate the motor’s performance.
- The motor control board also communicates with the safety features of the treadmill. For example, if a user falls or trips while using the treadmill, the motor control board may receive a signal from the safety key or emergency stop button, causing it to immediately shut off power to the motor and bring the treadmill to a stop. This helps prevent accidents and injuries.
-
With the incline mechanism of the treadmill:
Another essential interaction of the motor control board is with the incline mechanism of the treadmill. When a user adjusts the incline setting on the console, the motor control board communicates with the incline motor to adjust the position of the treadmill deck accordingly. This allows users to simulate different terrains and add variety to their workouts.
-
Interacts with various sensors:
Furthermore, the motor control board also interacts with various sensors throughout the treadmill. These sensors measure heart rate, distance travelled, and calories burned. The motor control board receives this data and may use it to calculate and display relevant information on the console, allowing users to track their progress and set goals for their workouts.
Importance of a Treadmill Motor Control Board:
Treadmills have become famous for individuals looking to stay fit and maintain an active lifestyle, especially in today’s busy world. The motor control board is a critical component that makes these exercise machines function effectively. This crucial element is vital in regulating speed, incline, and other parts of the treadmill. Let’s explore the advantages of a treadmill motor control board.
-
Precise Speed Control:
A treadmill motor control board allows for precise speed control, ensuring users can accurately set their desired pace. Whether you want to walk, jog, or run at a specific speed, the motor control board will help maintain a consistent and safe workout experience.
-
Adjustable Incline:
Many treadmills offer incline options to simulate uphill walking or running conditions. The motor control board allows for easy adjustment of the incline level, allowing users to customize their workout according to their fitness goals and preferences.
-
Safety Features:
Treadmills with a motor control board often come equipped with built-in safety features. These features can include emergency stop buttons or automatic shut-off mechanisms that activate in case of an accident or if the user falls off the treadmill. This ensures the user’s safety and reduces the risk of injury.
-
Smooth and Quiet Operation:
A high-quality motor control board ensures that the treadmill operates smoothly and quietly. It minimizes vibrations and noise, providing a comfortable workout environment for users.
-
Longer Lifespan:
The motor control board is an essential component that helps regulate the power supply to the treadmill motor. Ensuring proper functioning and engine protection can contribute to a longer treadmill lifespan. This means that users can enjoy their investment for a more extended period without replacing or repairing the machine frequently.
-
User-Friendly Interface:
Most motor control boards have an easy-to-use interface that allows users to adjust settings and monitor their workout progress. These interfaces often include speed controls, incline adjustments, and workout tracking. This user-friendly interface will enable individuals of all fitness levels to use the treadmill and track their progress effectively.
-
Customizable Workouts:
Users can customize their workouts according to their specific needs and preferences with a treadmill motor control board. Whether you want to focus on endurance training, interval workouts, or hill sprints, the motor control board allows you to adjust the speed and incline settings accordingly. This flexibility ensures you can tailor your activities to target different muscle groups and effectively achieve your fitness goals.
-
Data Tracking:
Many motor control boards have built-in tracking features that allow users to monitor their workout data. This can include distance, time, calories burned, and heart rate. By tracking this information, users can easily monitor their progress and adjust their workouts for optimal results.
-
Programmable Workouts:
Some motor control boards have programmable workout options, allowing users to create and save personalized workout routines. This feature primarily benefits individuals who prefer a structured workout plan or want to follow specific training programs. By programming the motor control board with your desired settings, you can easily access and repeat your favorite workouts without manually adjusting the settings each time.
-
Remote Control Option:
Many treadmills with motor control boards also come with a remote control option. This allows users to adjust the speed and incline settings without reaching for the console while running or walking. The remote control provides convenience and ease of use, allowing users to change quickly during their workout without interrupting their stride.
Testing Process of Treadmill Motor Control Board
The motor control board is crucial in various electrical devices and machinery. It plays a significant role in ensuring these motors’ smooth operation and efficiency. Anyway, like any electronic component, motor control boards are prone to malfunction or failure over time due to various factors such as wear and tear, overheating, or electrical surges. Therefore, it is essential to thoroughly test motor control boards before they are deployed in devices or machinery.
The Testing Process of Motor Control Boards:
The testing process of motor control boards involves several steps and procedures to ensure their functionality and reliability. Here is an overview of the testing process:
-
Visual Inspection:
The first step in testing motor control boards is a visual inspection. This involves examining the board for physical damage, loose connections, or component defects. Any visible issues are noted and addressed before further testing.
-
Power Supply Test:
The next step is to test the power supply of the motor control board. This involves checking the voltage levels and ensuring they are within the specified range for proper operation. Any deviations from the expected values may indicate a faulty power supply or voltage regulator.
-
Functionality Test:
A functionality test ensures that the motor control board performs its intended functions. This test involves connecting the board to a motor and running it through various speed, direction, and torque settings. The board’s ability to accurately regulate these parameters is assessed.
-
Communication Test:
Many motor control boards have communication capabilities, allowing them to communicate with other devices or systems. This test ensures the council can communicate and exchange information with other devices or methods, such as sensors, controllers, or interfaces. It involves sending and receiving data to verify the board’s communication protocols and compatibility.
-
Temperature Test:
Motor control boards are often subject to high temperatures during operation. Therefore, a temperature test assesses the board’s ability to withstand and regulate temperature changes effectively. The board is exposed to different temperatures, ranging from average operating temperatures to extreme heat or cold. The board’s performance and stability are monitored during these temperature variations to ensure it can handle the expected operating conditions without overheating or malfunctioning.
-
Durability Test:
Depending on the application, motor control boards are exposed to various external factors, such as vibrations, shocks, or humidity. A durability test evaluates the board’s resistance to these external factors. The board is subjected to simulated conditions that it may encounter during its lifespan, including vibration testing, shock testing, and humidity testing. These tests help determine the board’s durability and ability to withstand harsh environmental conditions.
-
Electrical Safety Test:
Ensuring the electrical safety of motor control boards is crucial to prevent any potential hazards or accidents. This test assesses the board’s insulation resistance, leakage current, and ground continuity. It also includes checking for any possible short circuits or electrical faults that could pose a safety risk. Compliance with relevant safety standards and regulations is essential during this test.
-
Performance Analysis:
After completing all the individual tests, a comprehensive performance analysis is conducted to evaluate the overall performance of the motor control board. This analysis compares the test results with the board’s specifications and requirements. It includes assessing efficiency, accuracy, response time, and stability parameters. Any deviations or shortcomings in performance are identified and addressed to ensure the board meets the desired standards.
-
Documentation:
Detailed documentation records all test results, observations, and actions taken throughout the testing process. This documentation is a reference for future troubleshooting, quality control, and improvement purposes.
The documentation also includes information about the testing equipment used, test procedures followed, and any modifications or adjustments made to the board during testing. This documentation is valuable for manufacturers, engineers, technicians, and customers who may need to refer to it in the future.
It helps identify any issues or trends that may arise during testing and provides a record of the board’s performance and compliance with standards.
Overall, the testing process of motor control boards involves a series of tests to ensure their functionality, reliability, durability, safety, and performance. These tests help identify potential issues or shortcomings in the board’s design or construction and allow for necessary improvements or adjustments.
List Of Tools Required For Testing The Treadmill Motor Control Board:
When troubleshooting your treadmill motor control board issues, having the right tools on hand is essential. Whether you are a seasoned technician or a DIY enthusiast, having the right tools can make all the difference in diagnosing and fixing any problems that may arise.
List of Tools for Testing Motor Control Board:
- Multimeter:
A multimeter is a versatile tool that can measure voltage, current, and resistance. It is essential for testing the power supply and circuits on the motor control board.
- Screwdriver set:
Different sizes and types of screwdrivers will be needed to open up the treadmill and access the motor control board for testing.
- Insulation resistance tester:
This tool is used to check for any insulation breakdown in the circuits of the motor control board, which can cause malfunctioning.
- Oscilloscope:
An oscilloscope is necessary for analyzing the waveforms and signals produced by the motor control board to ensure they are within normal parameters.
- Wire strippers and cutters:
These tools are needed to remove insulation from wires for testing and to cut wires as necessary.
- Soldering iron and solder:
If any components on the motor control board need to be replaced, a soldering iron and solder will be essential for the repair.
- Logic probe:
A logic probe is used to test digital circuits on the motor control board, helping to identify any issues with signal levels and logic states.
- Power supply tester:
This tool checks the motor control board’s power output and ensures it functions correctly.
- 9. Capacitance meter:
A capacitance meter is necessary for testing capacitors on the motor control board to ensure they are within tolerance.
- ESD protection equipment:
Electrostatic discharge (ESD) protection equipment, such as wrist straps and mats, is essential to prevent damage to the sensitive electronic components on the motor control board during testing.
How to Test a Treadmill Motor Control Board: Step by step Process
The motor control board regulates the speed and power of the treadmill’s motor, making it a vital component for proper functionality. Conducting a series of tests can help you identify potential problems and take appropriate action. This article will guide you through testing a treadmill motor control board.
-
Power off the treadmill:
Before testing the motor control board, ensure the treadmill is entirely powered off and unplugged from the electrical outlet. This will ensure your safety and prevent accidental damage to the board or other components.
-
Visual Inspection:
Start by inspecting the motor control board for any visible signs of damage or burnt components. Look for any loose connections, frayed wires, or blown fuses. If you notice any issues, such as burnt marks or melted parts, the motor control board likely needs to be replaced.
-
Inspect the motor control board:
Look closely at the motor control board for any visible signs of damage, such as burnt components or loose connections. If you notice any physical damage, it may indicate a problem with the board that requires professional repair or replacement.
-
Check for loose connections:
Carefully examine all the connections on the motor control board to ensure they are secure and properly inserted. Loose or disconnected wires can cause issues with the performance of the treadmill. Gently push on each connection to make sure it is firmly in place.
-
Test for power supply:
Test the power supply to the motor control board using a multimeter set to measure voltage. Connect the black probe to the ground or negative terminal on the board and the red probe to the positive terminal. If you are getting a reading of the expected voltage (usually 110-120V AC), then the power supply is working correctly.
-
Checking Capacitors:
Capacitors store and release electrical energy in the motor control board. A faulty capacitor can cause issues with the motor’s performance. To check the capacitors, use a multimeter to measure their capacitance or resistance. Refer to the manufacturer’s manual for the specific values that the capacitors should have. If any capacitors show readings significantly different from the specified values, they may be defective and need to be replaced.
-
Testing Transistors:
Transistors are electronic components that amplify and switch electrical signals in the motor control board. A faulty transistor can cause issues with the motor’s operation. To test the transistors, use a multimeter to measure their resistance or conductivity.
Refer to the manufacturer’s manual for the specific values that the transistors should have. If any transistors show readings significantly different from the specified values, they may be defective and need to be replaced.
-
Checking Diodes:
Diodes are electrical components that allow current to flow in only one direction. A faulty diode can cause issues with the motor’s functionality. To check the diodes, use a multimeter in diode mode and place the probes on each end of the diode.
The multimeter should display a reading indicating the forward voltage drop across the diode. Refer to the manufacturer’s manual for the specific values that the diodes should have. If any diodes show readings significantly different from the specified values or are not conducted in one direction, they may be defective and need to be replaced.
-
Inspecting IC Chips:
The motor control board may contain integrated circuit (IC) chips that play a crucial role in controlling the various functions of the treadmill. These chips can sometimes become damaged or faulty, leading to issues with the motor’s performance.
To inspect the IC chips, carefully examine them for any visible signs of damage, such as burnt marks or physical cracks. Additionally, check for loose connections or solder joints. If you notice any issues with the IC chips, they may need to be replaced.
-
Testing Motor Control Board Components:
In addition to the specific components mentioned above, other members of the motor control board may affect its functionality. These can include resistors, inductors, and other electronic components.
Use a multimeter to test these components for their resistance, conductivity, and any other measurements specified in the manufacturer’s manual. If any of these components show readings significantly different from the specified values, they may be defective and need to be replaced.
-
Testing Motor Control Board Inputs and Outputs:
The motor control board receives input signals from various sensors and controls the outputs that power the treadmill motor. To test the inputs and results of the motor control board, you will need to refer to the manufacturer’s manual for the specific sensors and outputs used in your treadmill model.
- To test the inputs, use a multimeter to measure the voltage or resistance at each input terminal. Compare the readings to the specified values provided by the manufacturer. If any input readings are significantly different from the specifications, there may be an issue with the sensor or wiring connected to it.
- To test the outputs, use a multimeter to measure the voltage or resistance at each output terminal while the treadmill operates. Compare the readings to the specified values provided by the manufacturer. If any of the output readings significantly differ from the specifications, there may be an issue with the motor control board’s ability to power and control the motor.
It is important to note that testing a treadmill motor control board can be complex and may require advanced knowledge of electronics. If you are unsure or uncomfortable with working on electronic components, it is recommended to seek the assistance of a professional technician or contact the manufacturer for support.
-
Testing Motor Control Signals:
The motor control board receives signals from the treadmill console or other input sources to control the speed and incline of the treadmill.
- To test these signals, you will need an oscilloscope or logic analyzer.
- Start by identifying the motor control signals on the board, such as PWM (Pulse Width Modulation) or analog voltage signals. Connect the oscilloscope or logic analyzer probes to the appropriate test points on the motor control board.
- Next, turn on the treadmill and observe the oscilloscope or logic analyzer display. The signals should be stable and consistent. If you notice any erratic or abnormal waveforms, it may indicate a problem with the motor control signals.
- You can also use a multimeter to measure the voltage levels of the motor control signals. Compare the measured voltage levels to the specified values provided by the manufacturer. If the voltage levels are significantly different, there may be an issue with the motor control signals.
-
Inspecting Other Components:
In addition to capacitors, voltage regulators, and connections, inspecting other components on the motor control board for any signs of damage or malfunction is essential. This includes resistors, diodes, transistors, and integrated circuits. Inspect these components for any signs of physical harm, such as burnt or discolored areas, loose connections, or bulging capacitors.
-
Test for error codes:
Some treadmills have built-in error code displays that can indicate specific issues with the motor control board. Consult your treadmill’s user manual to identify the meaning of any error codes displayed on the console. If you see an error code related to the motor control board, it may require further troubleshooting or professional repair.
-
Contact a professional:
If you have followed all these steps and are still experiencing issues with your treadmill motor control board, it may be best to contact a professional for further assistance. They will have the expertise and tools to diagnose and repair any underlying problems with the board.
How to Test a Treadmill Motor Control Board with a Multimeter:
The motor control board of a treadmill is a crucial component that regulates the speed and power output of the machine. If you suspect that your treadmill motor control board is malfunctioning, one way to test it is by using a multimeter. A multimeter is a versatile tool that can measure voltage, current, and resistance, making it ideal for diagnosing electrical issues. In this article, we will guide you through the steps of testing a treadmill motor control board with a multimeter.
- Turn off the treadmill and unplug it from the power source to ensure your safety while working on the motor control board.
- Locate the motor control board near the motor itself. It will have wires connected to it, typically labeled with letters or numbers for easy identification.
- Set your multimeter to the resistance setting (ohms) and touch the probes to ensure it works properly.
- Disconnect the wires from the motor control board, noting where each wire was connected.
- Place one probe of the multimeter on one of the terminals on the motor control board and the other probe on another terminal. Check the resistance reading on the multimeter. If the reading is within the manufacturer’s specified range, the motor control board functions properly. If the task is significantly higher or lower than expected, then an issue with the board may need to be addressed.
- Repeat step 5 for each of the terminals on the motor control board to ensure that all connections are working correctly.
- If you suspect a specific motor control board component is faulty, test it with the multimeter. For example, you can try the diodes or capacitors on the board by setting your multimeter to the appropriate setting and checking for continuity or capacitance.
- If you need help interpreting the readings from your multimeter, refer to the manufacturer’s documentation for your treadmill or consult a professional for assistance.
- Once you have completed testing the motor control board with the multimeter, reconnect the wires to their appropriate terminals and plug the treadmill back in. Turn on the treadmill and try it to see if the issue has been resolved.
Following these steps, you can effectively test your treadmill motor control board using a multimeter. Always exercise caution when working with electrical components, and consult a professional if you need help with how to proceed. Proper maintenance and troubleshooting can extend the life of your treadmill and ensure that it operates smoothly for years to come.
List of Safety Precautions to Follow During Testing:
Safety should always be the number one priority when it comes to testing, whether in a laboratory setting or out in the field. Following proper safety precautions protects the individuals conducting the tests and ensures accurate and reliable results.
- Wear appropriate personal protective equipment (PPE):
This includes gloves, goggles, lab coats, masks, and closed-toe shoes. PPE helps protect against chemical splashes, burns, cuts, and other physical hazards.
- Familiarize yourself with the testing procedures:
Before conducting any tests, ensure you are well-trained and familiar with the testing procedures. This will help reduce the risk of errors or accidents during testing.
- Follow proper handling and disposal protocols:
Be sure to handle chemicals, samples, and equipment carefully, following all recommended storage, handling, and disposal guidelines. Improper handling or disposal can lead to contamination or injury.
- Keep work areas clean and organized:
A cluttered work area can increase the risk of accidents and spills. Keep all workspaces clean, organized, and accessible to unnecessary items to prevent tripping hazards and ensure a safe working environment.
- Use equipment properly:
Make sure you are using all equipment correctly and according to manufacturer instructions. Improper use of equipment can lead to malfunctions, injuries, or inaccurate results.
- Never work alone:
Always have a buddy or colleague present when conducting tests, especially when working with hazardous materials or equipment, and have someone else assist in an emergency.
- Know the location of emergency equipment:
Familiarize yourself with the location of safety showers, eyewash stations, fire extinguishers, and first aid kits in case of an accident or emergency.
- Follow proper safety protocols in case of an emergency:
In a fire, chemical spill, or other emergency, know what actions to take and who to contact. Have an emergency response plan and ensure all team members know it.
- Stay up-to-date on safety training:
Regularly attend safety training sessions and refresh your knowledge of proper safety procedures. This will help you stay informed of any new safety information or protocols that may have been implemented.
- Report any safety concerns:
If you notice any potential safety hazards or issues during testing, report them to your supervisor or safety officer immediately. It is essential to promptly address and resolve safety concerns to prevent accidents or injuries.
By following these safety precautions during testing, you can create a secure and controlled testing environment that minimizes risks and ensures the safety of everyone involved. Remember that safety should always be a top priority when conducting tests, no matter the setting.
Common Issues with Treadmill Motor Control Board:
The motor control board is an essential component of the treadmill that regulates the speed and performance of the motor. When this board malfunctions, it can cause various issues that can affect the overall functionality of the treadmill. Some common problems with treadmill motor control boards include:
- Erratic speed fluctuations:
If the motor control board is not functioning correctly, it may cause the treadmill to experience erratic speed fluctuations. This can make maintaining a consistent pace while using the treadmill challenging, leading to a less effective workout.
- Inconsistent power output:
Another common issue with treadmill motor control boards is inconsistent power output. This can result in the treadmill being unable to reach or maintain the desired speed, making it difficult to use for workouts.
- Motor not running at all:
If the motor control board fails completely, the motor may not run. This can render the treadmill utterly unusable until the issue is resolved.
- Error messages on display:
A malfunctioning motor control board may also cause error messages on the treadmill’s display. These messages can indicate a problem with the board or other treadmill components that must be addressed.
- Burning smell:
If you notice a burning smell coming from your treadmill, it could be due
How To Fix a Treadmill Motor Control Board Problem:
Before fixing your treadmill motor control board, unplugging the treadmill from the power source is essential to avoid any electrical shocks. Once you have done this, follow these steps:
- Check for loose connections:
Inspect the motor control board for any loose or disconnected wires. Reconnect any loose wires securely and make sure all connections are tight.
- Inspect for any visible signs of damage:
Look for any burnt or broken components on the motor control board. You may need to replace the affected parts if you notice any damage.
- Reset the motor control board:
Some treadmills have a reset button that can be used to reboot the motor control board. Press the reset button and see if this resolves the issue.
- Clean the motor control board:
Dust and debris can accumulate on the motor control board over time, causing it to malfunction. Use a dry cloth or compressed air to clean the board thoroughly.
- Test the motor control board:
If you have a multimeter, you can test the motor control board for continuity and voltage to determine if it functions properly. Follow the manufacturer’s instructions on how to perform this test.
- Contact the manufacturer:
If you have tried all of the above steps and are still experiencing issues with your treadmill motor control board, it may be best to contact the manufacturer for further assistance. They can provide additional troubleshooting tips or recommend a professional repair service.
How Do You Replace The Treadmill Motor Control Board?
The motor control board is a vital component of a treadmill that regulates the speed and performance of the machine. If your treadmill is experiencing erratic speed, sudden stops, or failure to start, it may be time to replace the motor control board. While this task may seem daunting, you can easily replace the motor control board with the right tools and knowledge and save on costly repair fees.
Here are the steps to replace a treadmill motor control board:
- Safety first:
Before starting any repairs on your treadmill, unplug it from the power source to avoid electrical shocks.
- Locate the motor control board:
The motor control board is typically located near the motor of the treadmill. You may need to remove the motor hood or access panel to find it.
- Remove the old motor control board:
Disconnect any wires or cables connected to the motor control board. Use a screwdriver to remove the screws holding the board in place.
- Install the new motor control board:
Carefully place the new motor control board in the same position as the old one and secure it with screws.
- Reconnect wires and cables:
Make sure to reconnect all wires and cables to the new motor control board like they were connected to the old board.
- Test the treadmill:
Plug in the treadmill and test it to ensure the new motor control board functions correctly. Check for erratic speed, sudden stops, or failure to start.
- Adjust speed settings:
If necessary, adjust the treadmill’s speed settings to ensure it is running smoothly with the new motor control board.
- Replace motor hood or access panel:
Once you have confirmed that the treadmill is working correctly, replace the motor hood or access panel you removed in step 2.
Treadmill Motor Controller Troubleshooting:
To begin troubleshooting your treadmill motor controller:
-
Check for loose connections:
The first step is to check for any visible signs of damage or loose connections. Inspect the controller for burnt components, frayed wires, or flexible connectors that may be causing the issue. If you notice any physical damage, replacing or repairing the affected parts may be necessary.
-
Verify the power source:
Next, verify that the power source is connected correctly and turned on. Check that the power cord is plugged securely into an outlet and that the treadmill’s power switch is in the “on” position. If the treadmill still does not turn on, try plugging it into a different outlet to rule out any issues with the electrical connection.
-
Check for faulty motor controller:
If your treadmill is turning on but running at inconsistent speeds, this may be a sign of a faulty motor controller. To troubleshoot this issue, check the speed sensor and motor wiring connections. Make sure that all wires are securely connected and accessible to any damage. If the links appear in good condition, you may need to recalibrate the motor controller according to the manufacturer’s instructions.
-
Check for error messages:
If your treadmill displays error messages, consult the user manual for troubleshooting tips for your model. Standard error codes include “E1” (motor overheating), “E2” (speed sensor error), or “E3” (motor controller malfunction). Follow the recommended steps for resolving these errors, which may involve resetting the treadmill, recalibrating the motor controller, or contacting customer support for further assistance.
-
Contact a professional:
If you cannot resolve the issue on your own, contacting a professional technician for repairs may be necessary. They will have the expertise and tools to diagnose and fix more complex problems with your treadmill motor controller. Be sure to provide them with any information you have gathered during your troubleshooting efforts, such as error codes or observations of the issue.
In conclusion:
You understand how your treadmill motor control board works, and troubleshooting common issues can help you maintain your treadmill and prevent costly repairs. If you encounter any problems with your treadmill motor control board, it’s best to consult with a professional technician for proper diagnosis and repair. Regular maintenance and following the manufacturer’s guidelines for usage can help prolong the lifespan of your treadmill motor control board.
FAQs:
Can I repair a treadmill motor control board myself?
While an experienced DIYer can repair some minor issues with treadmill motor control boards, seeking professional help for more complex matters is generally recommended. Attempting to fix the motor control board yourself without the proper knowledge and experience can cause further damage to the treadmill.
It’s best to consult with a professional technician trained in repairing treadmill motor control boards to ensure the issue is properly diagnosed and resolved.
How can I prevent issues with my treadmill motor control board?
To prevent issues with your treadmill motor control board, it’s essential to maintain your treadmill correctly. This includes regular cleaning, lubrication of the belt, and inspecting the motor control board for any signs of wear or damage.
Additionally, avoiding excessive treadmill use and following the manufacturer’s guidelines can help prevent premature wear and tear on the motor control board.
How much does it cost to replace a treadmill motor control board?
Replacing a treadmill motor control board can vary in cost depending on the make and model of your treadmill. On average, a new motor control board can range from $100 to $500. However, this cost may also include labor fees if you have a professional technician install the new board for you.
If you are comfortable with DIY repairs, you can find replacement motor control boards online for a lower cost and install them yourself. It’s essential to make sure you purchase the correct replacement board compatible with your treadmill model. Additionally, if your treadmill is still under warranty, the manufacturer may cover the cost of replacing the motor control board.
Read More:
Urevo Treadmill Troubleshooting| 14 Issues